We ran out of space on our old NAS, the one bought by Tyler, and Brian asked us to help purchase and configure a new one. After considering several alternatives and consulting several people in LTS, we settled on the following:
QNAP TurboNAS TS-569L and 5 of the following:
Seagate NAS HDD model ST4000VN000
I opened the NAS and installed all the hard drives, moved the NAS into 121A and powered it on. Then I took their installation CD and inserted it into my Mac and mounted the QFinderMac_1.0.13_Build0607.dmg file. I dragged the QFinder application into my Applications folder, as instructed.
I then launched the QFinder application, which found a NAS on the network, so that’s presumably ours. It called it NASDB5EB3 and popped up a window to ask whether I want to configure it.
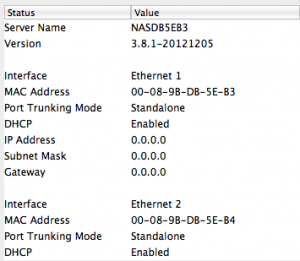
I noticed in the other window, which I can’t select as long as the popup window is here, that there is info about my new NAS, including its IP address (0.0.0.0), hardware address 00-08-9B-DB-5E-B3 and its firmware status, which says that there is an update available.
Later I could click on details of the NAS; here’s the screenshot:
I clicked yes in the popup window, which tells me I’ll be re-directed to the web browser. Unsurprisingly, it says it can’t connect to 0.0.0.0:8080. So, this is a pretty idiotic interface. Or, it may be that DHCP isn’t working because of Cisco CleanAccess? Time to check with Tim and Don.
Okay, eventually that worked, and it has a valid Wellesley IP address, and the web browser is able to talk to it. It offered me a choice of “automatic” versus “manual” installation, and I chose the latter even though I intend to choose the default option at most step.
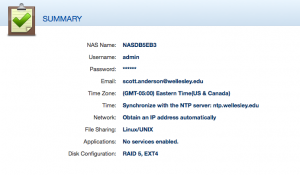
Step 1 is choosing name for the NAS and an administrator password. Default name is NASDB5EB3. Admin account is “admin.” I used the same password as Tempest. Also an email address; I used cs-sysadmin. Oh, but I’m not allowed to! It says “Invalid Email Format.” Stupid. I used my Wellesley email address.
Step 2 is date/time. Chose Eastern Time and made it sync with ntp.wellesley.edu
Step 3 is network. Default is to get IP address automatically, and I kept that.
Step 4 is services. Default os is Mac, and it says multiple are allowed. I’m assuming that these are for client machines, since under Linux it mentions NFS, as well as “Web File Manager” (whatever that is) and FTP. I enabled Linux only.
Also in this step is other applications. I disabled all of those. We don’t need it to be an iTunes server, among other things.
Step 5 is disk. Default is RAID 5 and an Ext4 filesystem. That’s exactly what I want. (Another option is RAID 6.) It calculates that this will give us 14,904.08 GB of storage capacity.
It recognized the drives as Seagate ST4000VN000-1H41SC43. There are also checkboxes to choose some drives as “hot spares.” There are also checkboxes for encrypted disk volume and bad block scan. I decided to check the latter; we might as well find out if there are any bad blocks on these drives, though it may run overnight to do so! They recommend only doing this if the installation is unsuccessful, so maybe that’s reasonable.
That’s it! Here’s a screen shot of the summary:
 Then a final few clicks on “apply” and “confirm,” and off we go!
It gives us a progress bar. Interestingly, it’s taking measurable time to even do step 1, of changing the admin password. But, the whole process didn’t take too long, maybe 10-15 minutes.
Logging in via the web interface is frustrating: there’s nothing to click on, nothing active, nothing to read. A complete dead end.
I can ssh as root to the machine. That’s cool.
Oh, the web interface is now working. Dunno why it wasn’t earlier.
It’s a pretty nice interface. I’m using it to update the firmware right now. I’ve also been able to mount the NAS onto Tempest, read-and-write, so I’m starting to copy Brian’s data. This will take a long time!


One Response to Purchase and configure NAS