Over the course of the last couple of weeks, Kelsey and I designed and built a windlass using 500 cm^2 of 3/16” Delrin, a 50 cm Delrin rod, and 120 cm of string using the techniques we learned during our bottle opener project and the in class Fastening and Attaching workshop.
Engineering analysis:
For this project we were given a set area of Delrin (500 cm^2), but could choose how we distributed that area across our windlass. We were also given the choice between two thicknesses of Delrin sheets, 1/8” or 3/16”, and we chose to use the thicker material in order to maximize the stability of our structure. In order to meet the time specification, we used our string to form a “V” shape which wrapped around two Delrin rods at once, doubling the distance the bottle was raised for each rotation of the handle as opposed to using a single Delrin Rod. Using two rods also helped to disperse the weight of the bottle.
The physics behind the stability of triangles played the largest role in our design. We knew we wanted to use rectangles, but we also realized that rectangles alone, even if we used I-beams instead of “H-beams,” would not be strong enough to hold the weight of the bottle. After making our foam core model, we checked the stability of our structure against left-to-right forces, forward-to-back forces, and a force going straight down. It was fairly sturdy forward-to-back because we used a continuous piece of foam core. The prism structure gave it stability against the downward force. Against the left-to-right force, the structure was not very stable because we had only used horizontal support beams to connect the sides.
We knew that diagonal beams would be sturdier, and it was after testing this model that we realized they would be necessary in our design. After adding the triangular pieces, our structure became significantly more stable and although the Delrin was also more stable than the foam core, we think that changing the support beams was the largest contributor to the change in stability.
The Design Process and Our Reflection:
When we began designing our windlass, first we focused on the framework and our initial thought was to use a combination of rectangles and triangles to stabilize the structure. Our first design was a rectangular prism with two square plates attached to the left and right of the base and four diagonal support beams on the outside of the prism. The diagonal beams would form triangles with the plates and the sides of the prism. Our initial thought for the windlass itself was just to have the string attached to a single Delrin rod across the top of the prism with a handle to wind the string around the rod and pull the bottle up.

Our Initial Sketches
We realized quickly that using solid plates for our base would unnecessarily use up a large portion of our allotted amount of Delrin, so we decided to cut out the majority of the plate, leaving behind a 3 sided outline. To form the prism we decided to use 2 three-sided rectangles, which we planned on attaching to the base using a press fit peg and slot. These side pieces would be attached to each other, again using press fit pegs and slots, with two rectangular beams on each side, one at the top and one in the middle. We used this design to build a “mockup” out of foam core.
We decided to exclude the diagonal support beams from our foam core model with the intention of adding them if we felt that the structure was not sturdy enough. After cutting and putting together our foam core model, we felt that the beams connecting the sides of the well did not provide enough support. Instead of adding the diagonal beams outside of the prism, which we thought would be difficult to fasten, we cut out the pieces attaching the two sides of our base and used them as a third support beam on either side. We liked the idea of having our base be two long rectangles not attached to one another, but we still were unhappy with the left-to-right movement.

Our Foam Core Model with the Change in the Supports
We decided that to incorporate the stability of triangles, we would replace the bottom two beams with a diagonal support. In our first solidworks drawing we kept most of our design the same, but we increased the thickness of the top and designed a new, “7” shaped support piece on the sides. We also decided to use two Delrin rods to disperse the weight of the bottle while winding up the string. We added two square pieces, with a loose fit hole in each, to the top of each of the side supports for the rods to fit through. In this design all of our pieces were being held together with press fit pegs and slots, the size of which we determined by cutting test pieces.

Our Test Plates

Our Initial “7” Shaped Support Piece
We accidently used the wrong size Delrin when cutting our first iteration, so our press fit connections did not work, but from this mistake we were able to improve our design. We realized that getting multiple press fit joints on one piece to line up exactly was difficult, so in our second iteration we opted to use smaller, looser fit pegs and the thermal press to make the majority of our connections more sturdy. We also added an additional support beam to our final design, turning out “7” piece into a “Z”.
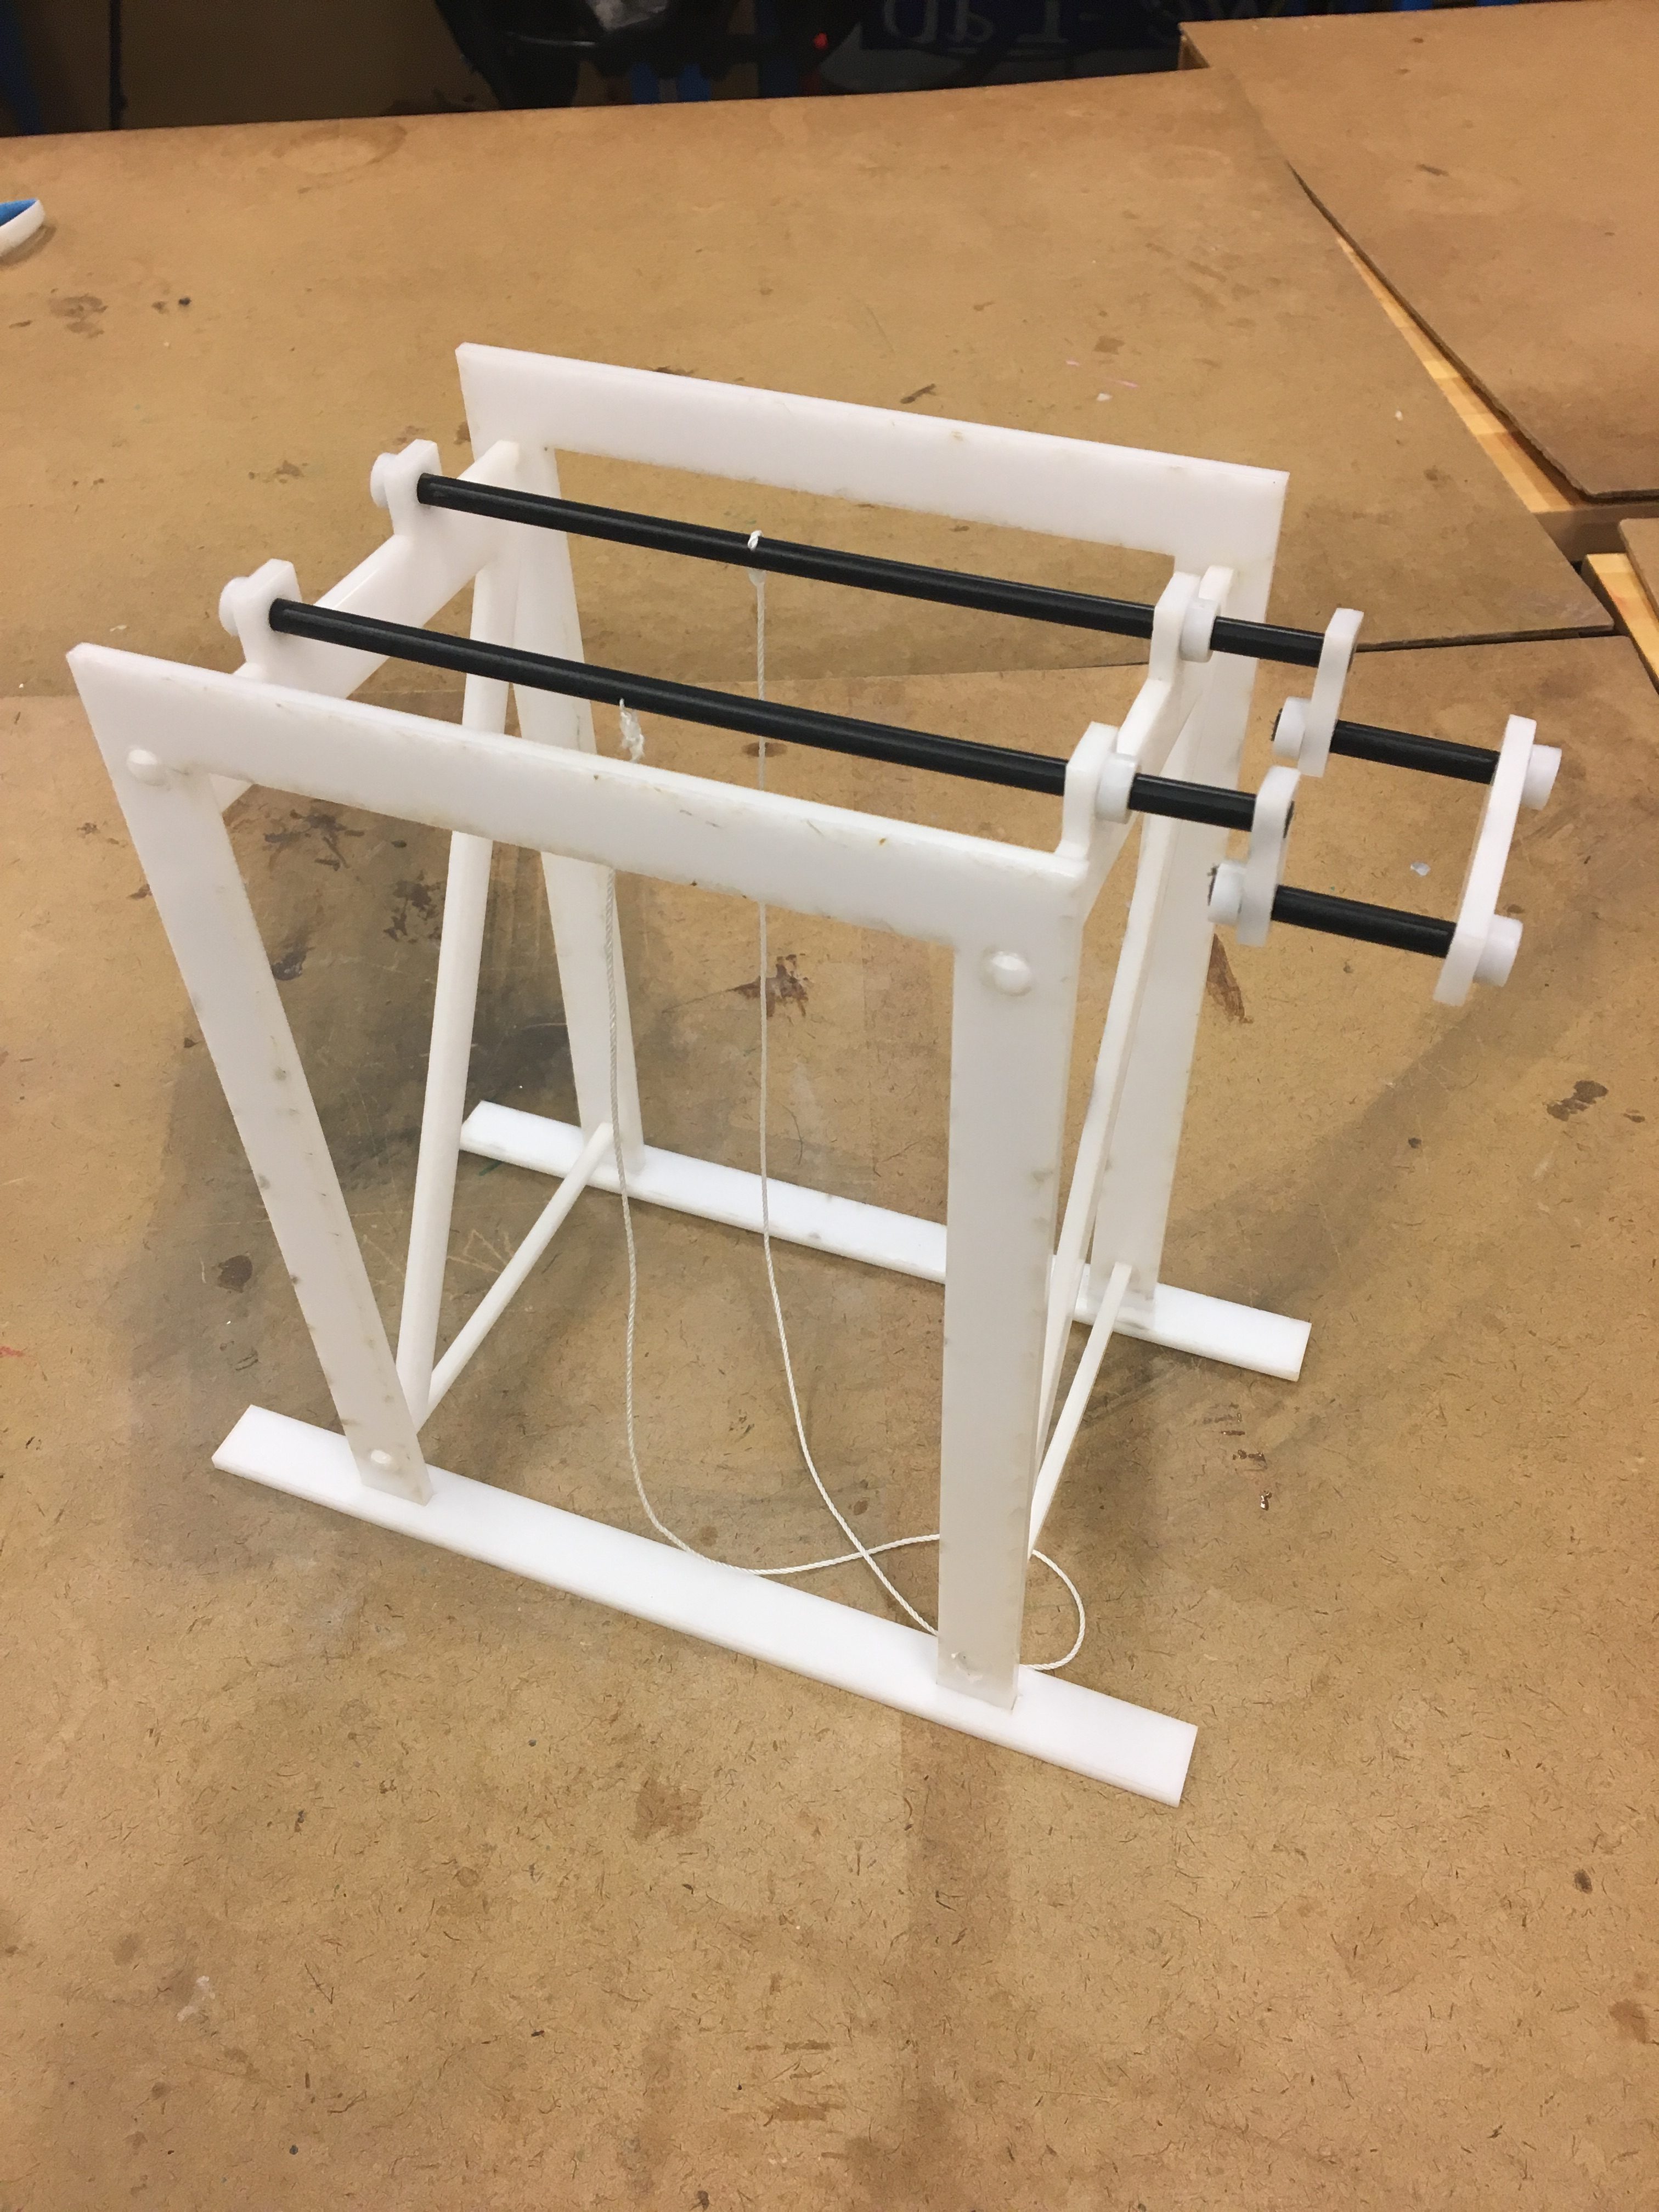
Our Final Windlass
For the windlass, initially we were going to have two separate handles for each Delrin rod, but we figured out a way to connect the two in order to allow both to be cranked with one hand. We used both press fit and loose fit connections in order to do so. We also made tight fit bushings to hold the Delrin rods and handle pieces in place.

Our Handle
Although our windlass worked fairly well, we were not able to crank it quickly without holding the base to the table. If we made another iteration, we would have like to include a way to support our windlass against the inside edges of the table to stabilize it. Also, with the amount of string we were given, our design did not allow the bottle to begin from the floor. In our next iteration, it would be interesting to try to find a way to tweak the way we used our delrin rods in order to allow our string to have the maximum initial length.
One large thing I would have liked to do was reduce the amount of material we used, which was just barely under the limit. We could have reduced the overall height, which was 25 cm to the bottom of our top piece, to 20 cm (at least), which would saved us 40 cm^2 and still would have allowed 10 cm of the bottle to clear the top of the table. During our design process we were trying to remain under the 500 cm^2, but it would have been better to try to use as little material as possible.
Accounting of Materials Used:
Total Area Used: 499.78 cm^2


I loved the handle you used for your windlass. It creative and unlike anyone I have seen. How did you come up with the design?
Definitely the most interesting design. I love how you utilized press fit and loose fit in the handle. The windlass was stable, and my group struggled a lot with stability. Good job.
I find your design for the crank really interesting!!! I really like how you used the string to make a loop to attache the bottle to.