FINAL PROJECT UPDATE POST.
5/10/2017
IMPROVEMENTS FROM THE CLASS EXHIBITION.
Photocells.
From the feedback from in-class exhibition, I decided to reposition the photocells so that they are underneath the square part of the leg.

So that the LED lights up ONLY when both of the legs are 90 degrees folded. See the video below!
Coding.
To make this happen, I made some edits to the code.
I made the threshold =0 because I only wanted the LED to light up when the photocell is under the leg meaning it would be pitch dark(=0.) So I also changed the “if” part so that when the right and left photocell are both 0, the LED turns on.

CLEAR DESCRIPTION.
Cubbies are fully used at the Child Study Center. From a set of spare clothes to artworks created in class, the children put all kinds of things in their cubbies. However, for 3-5 year olds the top part of the cubby can be difficult to reach and often, they need help from an adult.
The wooden foldable stool installed at the bottom of the cubby solves this problem. It is designed children-friendly with round edges and minimum parts. The drawer slides and the hinges for legs are adjusted so not much strength is required to use. In addition, safety is greatly considered in the engineering design process. Two photocells are positioned under each leg, which allows the LED light in the front to light up only when both legs are completely unfolded. Using the Arduino code, the LED lets the children know that the stool can be used safely.
Instructions for Use:
Step 1: Pull the stool out,
Step 2: Pull the legs out,
Step 3: Wait till the LED light is on, and it’s ready to be used!
Step 4: Fold in the leg and push the stool in.
HIGHLIGHTS (OF THE STOOL DESIGN)
1. SIMPLE STRUCTURE
The simplicity of the design makes it functional and easy-to-use. All that is required is pulling the base part of the stool, lowering the legs, (LED turns on!) and then putting it back. Also it does not take too much space, less than two inches off the bottom part of the cubby.
2. EASY HINGES
From trial and error, the hinges used in the final stool allows the legs to go from 0 to 90 degrees with minimum effort. Easy for kids!
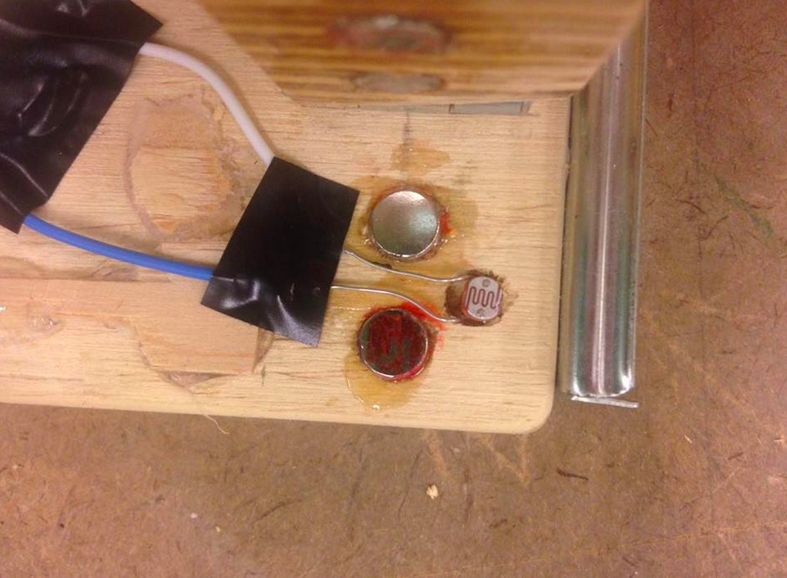
3. MAGNETS ON THE LEGS and the SIDE
Following the easy hinges, the super magnets that are glued and placed right at the square part of the legs makes the hinges stop right at 90 degrees. Something that the door hinges used on the prototype before was the definite sturdiness. By having two super magnets on each side, it locks the legs at 90 degrees. Also, it makes it easier to unfold because the magnets click to each other when pulling out the legs.
Another pair of super magnets are placed at the end of the base part. This was, honestly a clever idea that came up while running into a problem. The door hinges used before were very sturdy that it only went 90 degrees or 180 degrees. However, the simple hinges made the legs too easy for it to move that when it was installed, the legs would flop down from the very beginning before even using it. So, I decided to insert one magnet for each leg to prevent that. The super magnet was too strong at first that it was hard for the legs to come down, so then I used the hot glue gun to make a barrier/blob and adjusted the height of it with couple of tests.
4. MINIMUM “TECHY STUFF”
Two photocells and one LED. That was all I used.
Adding to the Arduino board and the battery case, even with all the wires taped, the stool itself remain thin. Also, all could be covered up which was requested by Tracy.
5. DRAWER RAILS
Another thing that made the design of the stool functional was the rails. Using something that the children would be familiar with, the drawer rails made the design of the foldable stool possible to make in the first place.
HIGHLIGHTS (FOR ME)
1. WOOD WORK!
I had so much fun while I spent so much time working on the actual building part of it. From working out the hinges to attaching the drawer rails correctly, I learned the little things about woodwork; the different types of screws(thank you very much Larry), choosing the right diameter for the pilot hole, to never go against the wood pattern…etc and also how to use the wood machines.
2. THINKING LIKE A LITTLE KID!
The smooth surface, rould edges, the legs drawn, the white bright LED light, the easy-to-pull-out legs, the rails…when making the stool I thought “what would the children do? what would the children like?”
Making this project a lot more technical/mechanical and more 21th century looking would’ve been very much possible by for example, changing the material or installing a robot in the back so that the legs would come out automatically when someone pushed a button or sticking with the scissor-lift idea in the first place (which would have made the possibility of the kids snapping their fingers much higher)…etc.
However, making a stool suitable for the Child Study Center was a priority in the making process and I very much enjoyed thinking from the user’s perspective and not just mine.
3. SOLDERING
One more thing that was a highlight for me was the soldering and the wiring part. Ever since, I learned how to use the soldering iron in 8th grade, I’ve been a huge fan of soldering and this time too.
PHOTOS.
These were taken after the updates were made to reposition the photocells. The second photos has the Arduino stuff uncovered but it is because I had to take off the thin wooden paper.


REFLECTION.
The initial reason why I chose to work on the cubby stool was because of my interest in furniture design. I haven’t had much experience in wood work but I wanted to use this opportunity to be passionate about both the designing aspect of the stool and the engineering aspect using Arduino.
Overall, I had a great time spending time in the workshop. And honestly, I’m very happy with how the foldable stool turned out since it was pretty much what I imagined in the beginning.
Working by myself and not in teams was a choice that I made because of my schedule but I think it made me learn more especially with Arduino stuff. Because I had to figure out the bugs and wire it by myself, now I know how to do every bit of what I did. However, looking at Kelsey and Julia’s project, I did think that my project was durable for one person and if my project wasn’t so straightforward I would have had a very hard time.
Everything took time, but I think making a rough wooden prototype in the same scale first, helped a lot to visualize how the children would use the stool and how the feedback and control can be added on. I was able to think ahead of the next steps this way. From this, I took away the importance of prototyping when making something. Not always, but if you have an idea or a function that you can add, make it first instead of thinking thoroughly!
Throughout the last weeks of ENGR160, I learned a lot about making a product from zero and how much time and effort it requires. As Amy introduced to us in the first place, for the Redbox system to be created soooo many years were spent until they finalized the design of it. Very small things might matter a lot and in this class, we weren’t so caught up with the materials/cost but in the real world, we wouldn’t be able to just make whatever.
For the more mechanical side of the design, it was frustrating at times for the coding, and also the soldering/wiring took a lot of concentration for each step. Nevertheless, I enjoyed every moment I spent of my final project and learned a lot about what it means to “make” something. As a lover of “making” things, I was able to experience more of engineering “making” than the art “making.”
WITH MORE TIME…
I definitely would calculate the physics of the maximum weight it could hold and do some tests to make sure its 100% installable. Also I would really want to see the children’s reaction to the stool! Possibly next year, next semester!
Thank you very much to Amy for being an amazing professor and also for this project, I bother Larry way too many times so thank you thank you.
