Post Child Studies Center Pitch:
Overall, the WashBoard idea was well received at the study center. However, some of Professor Gleason’s main concerns and potential tweaks included:
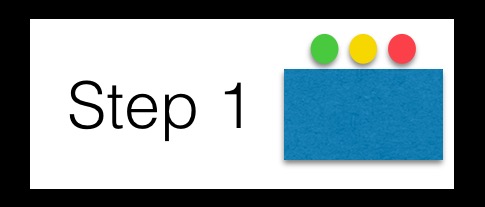
- Vertical orientation of LED lights to reflect a traffic light
Originally, shown in the image below, I had planned to have the LED lights oriented vertically near the image of each instruction. Initially, I wanted the LEDs to order as green, yellow and red to reflect the start and end of each instruction’s duration. However, this configuration of LEDs contrasts with that of a traffic light.
Using the traffic light principle to provide the children with a sense of duration for each step is integral to the project. Therefore, having the LED lights oppose the configuration of standard traffic lights could prove to confuse children when following the WashBoard’s instructions.

To use the similar traffic light concept and minimize confusion amongst the children, I decided to horizontally orient the LED lights. Additionally, I planned on ordering special LED lights that are capable of turning red, green and yellow; therefore, separate LED lights for each colour will not be required. By having all the LED lights turn to either green, yellow or red at given points, children will be certain of when an instruction is beginning, in the midst and ending.
- Orientation of washboard by the sink (vertical or horizontal)
Although the WashBoard device was originally designed to operate vertically, it was important to consider the orientation in which children would best understand the transition between each instruction (i.e.: horizontally or vertically). After some discussion, we found that it would be best to have the WashBoard oriented vertically as to better demonstrate a flow between each step.
- Making transitions between each instruction obvious to the children
Simply having LEDs turn on and off/ change colour on each panel will not be obvious enough to signal transitions to children. Keeping this in mind, the WashBoard originally incorporated linkages behind each panel. Hence, the lifting of one panel and retraction of another would better demonstrate the end of one action and the beginning of another.
However, incorporating linkages into the circuit proved to be challenging. The inclusion of linkages would require the use of a motor, gear train, and lego rods. All these items prove to add bulk to the device and increase battery power needed to supply sufficient voltage to the system.
To counteract this issue, I planned on using backlights to illuminate images accompanying all instructions on each panel. Although this solution prevents the panels from moving, it makes transitions between each action clear.
- Having the whole circuit shut down when tap resumes original position
The taps in the CSC operate by faucets, therefore choosing an appropriate sensor/feedback and control device for the WashBoard proved to be a challenge. Prof. Gleason talked about wanting the entire WashBoard to cease operation and prepare for a new cycle when the faucet resumes its original position. Hence, I decided on using IR break beam sensors.
The WashBoard will be programmed to remain defunct when the IR beams are interrupted (faucet in original position; tap off) and turn on the system when the IR beams are restored (faucet moved; tap turned on). Using such a sensor will allow the WashBoard to pick up on the slightest faucet deviations. Therefore, students nor teachers will be required to turn the faucet completely for the WashBoard to begin operation.
Designing Prototype:
After troubleshooting the above-mentioned issues, I began to construct a foam core prototype of the WashBoard. Working with foam core allowed me to gain a better understanding of how to construct the WashBoard. I was made aware of the various components of the device and materials required for its construction (i.e.: Delrin versus wood).
The WashBoard’s backboard and panels will be made of plastic, to help waterproof the entire system. The entire circuit (arduino board, wired and battery pack) will be drilled onto the back of the WashBoard. A clear plastic cover will be used to cover the circuitry behind as to prevent its contact with water.
Wires will connect digital components on the panels (i.e.: backlights and LEDs) to the arduino board behind. The wires will have to be soldered to the LEDs and backlights, and holes will have to be drilled at the back of the WashBoard to allow wires to connect through the board rather than wrap around.


Finalizing Material Order:
- IR Break Beam Sensor


- Delrin Plastic
- White LED backlights


A resistor of optimum resistance must be connected in series with the backlights. A suitable resistance that is not too low (causing the backlight to fuse) and too high (allowing the backlight to operate at maximum brightness).
- Faucet
- Diffused flat digital RGB LED pixels


The pixels are far better than using individual LEDs. Each light part of the strip can be controlled. All lights can turn red, green or yellow and the entire strip only takes up two pins on the arduino board.
Reflection:
Upon reflection, I think my biggest challenge will be coding in week 2. On the other hand, after having built the prototype I have a good sense of how I am going to connect the whole circuit together. My biggest concern is composing the code for the above-discussed functions (i.e.: LED changing colour over time interval; back boards lighting up for given period of time, WashBoard circuit turning on when IR beam is restored).

I love how you adapted to the issues you were facing like incorporating the backlight instead of using the mechanism that would raise the panel. I think it’ll prove to be just as effective and still really cool!
Using IR break-beam sensors is a really cool way to sense if the sink is on or off! Also, I think the addition of the backlights was a great way to adapt your original idea. I can’t wait to see your final product!
I like how you had an initial vision of your project and then were able to adapt it to the suggestions/opinions of the science center. Like considering how a stop light horizontal could be confusing to kids. Also, I really love the look of your design.