The final project of the ENGR 160 class involved us creating a device capable of solving problems faced at the Child Studies Center (CSC). During our visit to the CSC, Prof. Gleason explained some of the day-to-day issues the teachers face when dealing with children. Problems ranged from transitioning between activities to children being unable to reach the top of their cubbies.
The issues faced when it came to children washing their hands particularly intrigued me. Children are often distracted by various elements when at a sink. As a result, they do not follow the necessary steps required to most hygienically and efficiently wash their hands. The device I proposed, the WashBoard, serves as an automated hand wash guide. It aims to focus the attention of children on the various steps involved when washing their hands.
In summary, the WashBoard makes use of backlights to illuminate an instruction. Each instruction lasts for a given period of time. While a panel is illuminated a series of green, yellow and red LEDs light up consecutively to provide a sense of duration of each step. In other words, when a panel is illuminated the green LED turns on to signal the beginning of the action. Once the child in midst action the green LED turns off and the yellow LED is turned on. Shortly before the instruction ends, the red LED turns on— signaling the completion of an instruction. Following this, the illuminated panel and red LED turn off while the consecutive panel and green light turn on.
The WashBoard utilizes an IR break beam sensor, a mode of feedback and control, to automatically turn on the WashBoard when a child turns on the tap. When the tap is off, the faucet’s position provides a break in the IR beam. However, when the faucet is moved to turn on the tap, the IR beam is restored and ensues the WashBoard’s series of commands.
WashBoard Operation Storyboard:
- Child walks up to the sink
- Child turns on the tap
- WashBoard is initiated
- Panel 1 with step 1 rises – i.e. wet hands (10 seconds)
-
- Panel out for 10 seconds
- Green light on for 6 secs
- Green light turned off after 6 secs, yellow light turned on
- Yellow light on for 4 secs
- Yellow light turned off after 4 seconds, red light turned on
-
- 1st panel retracts and 2nd panel with next step rises
- Same process occurs through all steps (note: time of each step will vary)
- Once each step is completed WasherBoard turns off (all lights off and panels down)
Week 1:
We were introduced to the various issues we could help solve at the CSC. Whilst brainstorming devices I could build to solve the issue of washing hands, I chose to prioritize the elements of reading, time and engagement.
The following diagram shows my initial mock up of the WashBoard device.

Initially, I wanted to include LEDs on each panel and have linkages rise when an action is ensuing. I wanted to make use of the ‘traffic light’ concept to help provide a sense of duration of each step. The raising of each panel would have not only made each instruction obvious, but also have provided a smooth transition between steps as one panel rises and another recedes.
Post pitching my idea to the CSC, I planned on changing the orientation of the set of LED lights on each panel. The current vertical orientation of green, yellow and red is counterintuitive to a traffic light and could prove to confuse the children. Therefore, I decided on orienting the LED lights horizontally and have them turn on from left to right— an idea combining the colour association of each action to a traffic light and the principles of reading.

Additionally, Prof. Gleason expressed her concern of having the whole circuit shut down when the tap resumes its original position.
As I began to design my first prototype, I began to consider the various components of the device. The battery pack and breadboard would be drilled into the backboard of the WashBoard. Wires connecting each panel would have to be attached to the arduino board behind without being exposed at the front. I planned on having the backboard made out of Delrin, however, was made aware of the limitations of gluing the panels to plastic.


Additionally, I realized that the use of linkages to raise panels would not be possible due to their bulky structure and high power usage. Therefore, I decided on using LED backlights to light up all panels to make each instruction obvious. I also finalized my mode of feedback and control. The use of IR break beam sensors, located above and below the faucet, would be used to detect when the tap is off or on— an action automatically turning the Washboard either off or on.
Week 2:
This week focused around coding and the CSC demonstration. As some of my ordered materials hadn’t arrived as yet, I created a circuit consisting of two panels (backlights), two LEDs (that turned on with their respective panel) and a switch to turn on the whole circuit.
In other words when the button is pressed the following actions will ensue:
- Button is turned on
- Panel 1 illuminates- LED 1 and Backlight 1 turn on for 5 seconds
- Panel 1 turns off
- Simultaneously, panel 2 turns illuminates- LED 2 and Backlight 2 turn on for 5 seconds
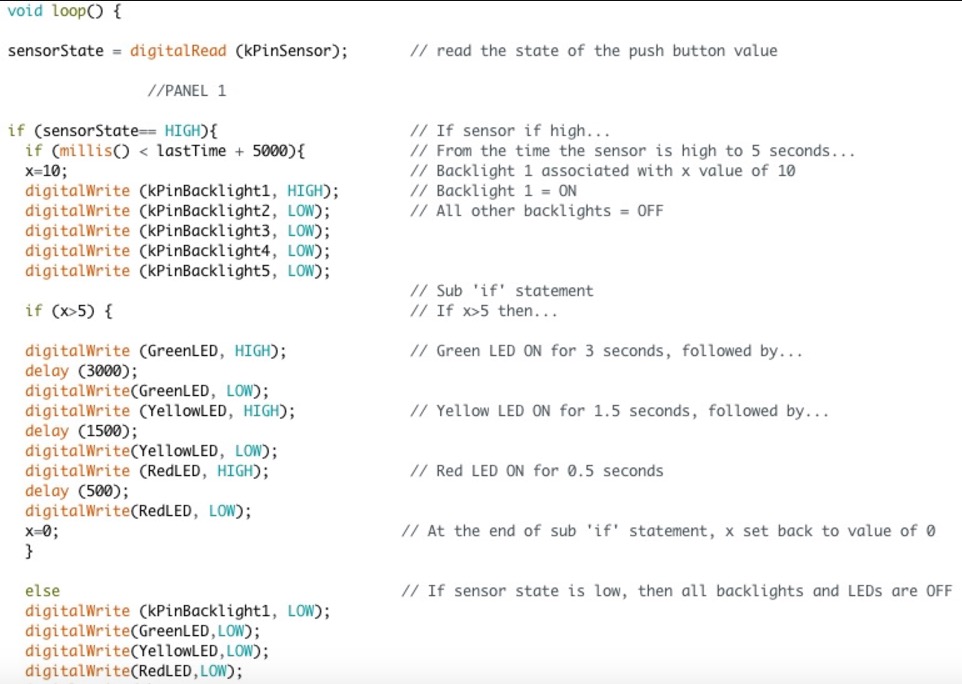
When coding I primarily made use of an ‘if’ statement and delay function. The following image shows the code I used and explain the function of each line.


Video Link: https://drive.google.com/a/wellesley.edu/file/d/0B6v9fzbfouJXblhxdm40bll5b00/view?usp=sharing
Post demonstrating the above prototype to the CSC, Prof. Gleason and I discussed using a sufficient number of steps as to not overwhelm the children with instructions. To make sure I use an optimal number of steps, I used the “hand washing” posters in their classrooms as a guide. I also planned on visiting the CSC and observing children wash their hands to find appropriate timings for each step.
Week 3:
This week consisted of a lot of coding and of putting the device together. The delay function used to enact a series of actions for the CSC demonstration was sufficient, however too primitive to include when incorporating more backlights, LEDs and varying time restraints.
The use of the ‘millis’ function allowed me to control the durations for which each LED would light up when a panel is illuminated. Although I had chosen to use Diffused Flat Digital RGB LED pixels, I ended up using standard LEDs as they proved to be more appropriate for the commands I wanted to implement. One set of green, yellow and red LEDs were placed at the top of the WashBoard to serve as a time guide for the whole board. The following commands were encoded into the arduino board:
1) Wet hands (Text displayed: “Wet Hands”) ~ 5 secs
– Green LED on for 3 secs (begin action)
– Yellow LED on for 1.5 secs (midst action)
– Red LED on for 0.5 sces (end action)
2) Squirt soap onto hands ( Text displayed: “Soap”) ~ 7 secs
– Green LED on for 4 secs (begin action)
– Yellow LED on for 2.5 secs (midst action)
– Red LED on for 0.5 sces (end action)
3) Scrub hands with soap (Text displayed: “Scrub”) ~ 20 secs
– Green LED on for 10 secs (begin action)
– Yellow LED on for 9.5 secs (midst action)
– Red LED on for 0.5 sces (end action)
4) Wash soap off hands (Text displayed: “Rise Hands”) ~ 6 secs
– Green LED on for 3 secs (begin action)
– Yellow LED on for 2.5 secs (midst action)
– Red LED on for 0.5 sces (end action)
5) Turn off tap (Text displayed: “Turn tap off”) ~ 7 secs
– Green LED on for 3 secs (begin action)
– Yellow LED on for 2.5 secs (midst action)
– Red LED on for 0.5 sces (end action)
The image below shows the code programming these functions.
Video Link: https://drive.google.com/a/wellesley.edu/file/d/0B6v9fzbfouJXSkJUeC1LWjBWUGc/view?usp=sharing
Following the completion of the code, I began to put my device together. I used Solidworks to create the wooden backboard and foam core backlight frame. Creating holes within the backboard, I soldered all connections and added a battery pack. A ‘stand’ was made for the sensors and a gate to replaced the batteries.


Video Link:https://drive.google.com/a/wellesley.edu/file/d/0B6v9fzbfouJXTzdlQVY0VzBKems/view?usp=sharing
Reflection:
Overall, I am very satisfied with my final product. I believe I was able to successfully demonstrate the main function and purpose of the device. Although I had several issues coding, the process has given me a deeper understanding of the C++ language. Furthermore, putting the device together has taught me the pros and cons of using wood versus plastic or foam core. I now know the appropriate adhesives required in gluing specific materials and have learned how to solder.
If I were to make further edits to my final project, I would try and made the hook more accessible to the wall. (i.e. place is towards the end of the box, rather than the backboard). Additionally, I would like to create a more appealing and stable battery gate.
Sarah Barbrow, the science librarian, also brought up the interesting concern of children who are colour blind being able to read the LED lights at the top of the panel. Since the lights illuminate from left to right, similar to how a child reads, I don’ think they should have great trouble in getting a sense of duration for each step. However, I would be interested in looking into non-colour associated ways in which to tell the duration of each step.

Love the detailed account of your final project. I was very impressed by your project! It was awesome!
So cool!!! I think your use of the sensor is really cool and an innovative way of doing it